I got this working and figured I would let everyone know how I did it.
First, thanks to Veeam for the Veeam Business View for VMware product. Nice freebie!
Second, there are 2 files that are necessary to make this happen, along with registering the plug-in.
The first file, is the actual file that is going to be telling vCenter where to go to get the content to display. I named it veeambusinessview.xml. Here is a copy of the contents of mine:
<scriptConfiguration version=”1.0.0.13″>
<key>com.veeam.business.view</key>
<description>Veeam Business View</description>
<view parent=”Inventory.Global”>
<title locale=”en”>Veeam Business View</title>
<url>http://vcenterserver:1340/</url>
<icon>http://vcenterserver:8086/veeambusinessview/veeam.png</icon>
</view>
<view parent=”Inventory.Datacenter”>
<title locale=”en”>Veeam Business View</title>
<url>http://vcenterserver:1340/</url>
</view>
</scriptConfiguration>
Be sure to replace the vcenterserver value with the name of your vCenter Server. Also notice I’m using the default 8086 port for vCenter, and the default 1340 port for the Veeam Business View installation.
The second file, is a simple Veeam graphic that I grabbed from their twitter page.![]()
Now, take these files, and put them in a folder named veeambusinessview in this location:
C:Program FilesVMwareInfrastructureVirtualCenter Servertomcatwebapps
Now that the files are loaded, they need to get registered in vCenter.
I decided not to use the PowerShell registration utility for VI Client Plug-ins, but rather through the vCenter Managed Object Browser, using the details described in this document.
In the document, it details how to add, but not exactly what to add.
Here is what I came up with:
<extension>
<description>
<label>com.veeam.business.view</label>
<summary>Veeam Business View</summary>
</description>
<key>com.veeam.business.view</key>
<version>1.0.0.31</version>
<subjectName>Veeam Business View</subjectName><server>
<url>http://vcenterserver:8086/veeambusinessview/veeambusinessview.xml</url>
<description>
<label>com.veeam.business.view</label>
<summary>Veeam Business view</summary>
</description>
<company>Veeam</company>
<type>com.vmware.vim.viClientScripts</type>
<adminEmail>name@company.com</adminEmail>
</server>
<client>
<version>1.0.0.31</version>
<description>
<label>com.veeam.business.view</label>
<summary>Veeam Business view</summary>
</description>
<company>Veeam</company>
<type>com.vmware.vim.viClientScripts</type>
<url></url>
<icon>http://vcenterserver:8086/veeambusinessview/veeam.png</icon>
</client>
<lastHeartbeatTime>2009-07-08T12:59:59.234375Z</lastHeartbeatTime>
</extension>
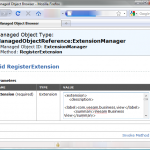
So, it should look something like this:
 |
Modify these values to match your environment (replace vcenterserver and ports if necessary) and select Invoke Method.
All that is necessary to do now, is close your VI Client, and restart it. The plug-in will appear automatically, and does not have to be installed, the same way the Performance View works in vCenter 2.5 Update 4. Depending on what URL you use for your Veeam Business View web server, you might have to consider things like trusted sites/etc. If your Veeam Business View web server is in the same domain, and is considered a trusted site, you should not have to log into it separately.
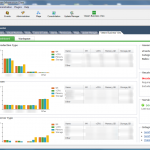
When you log back into vCenter through the VI Client, you should see something like this:
 |
When I get some free time, I’ll have to see how this works with vSphere.

